


Photo by Bernd Dittrich on Unsplash
Using dev containers in VS Code
Reproducible and isolated development environments!


Foreword
When a new software developer joins a company, it is common that his or her development environment is needed to be configured. This configuration can be done manually and it can be a hassle to make sure that the environments among developers are consistent.
Thanks to the existence of containerization technology, this obstacle can be overcome. Introducing: dev containers! Dev containers allow you to create reproducible and isolated development environments. Microsoft VS Code is awesome for pioneering it!
Gone are the days that you need to install development tools in your host machine. You just open a dev container and immediately start working in a consistent environment.
An example
Below is a simplified diagram on how it would feel to work with a Node.js dev container.
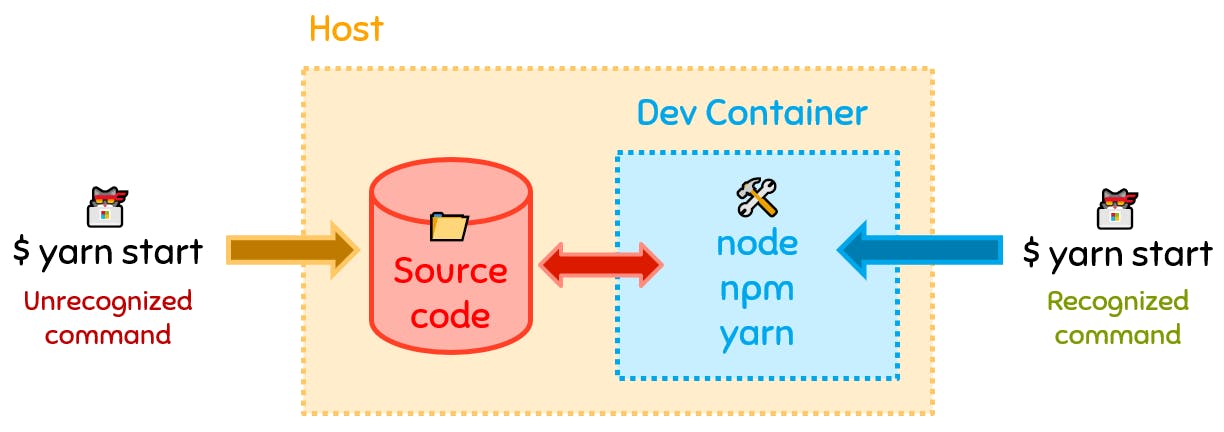
In this diagram:
- The host is the host operating system running the Docker daemon.
- In this example, running
yarn startin the host CLI will be unrecognized since Yarn is not actually installed in the host itself.
- In this example, running
- The source code is located inside the host file system and it is mounted as a volume to the dev container. With this, the source code changes you reflect from the dev container will be reflected in the host.
- The dev container is running using Docker and has the necessary development tools prepared for you.
- Thus, running
yarn startin the dev container CLI will be recognized and will allow you to start your development workflow in isolation.
- Thus, running
Getting started
Setting up
To start using dev containers in VS Code, it is recommended to install the Remote - Containers extension for creating and managing dev containers. Using the extension, you can try a dev container sample or generate the dev container files directly in an existing workspace.
VS Code looks for a devcontainer.json which tells how the dev container is configured. It is typically found in the .devcontainer folder where the Dockerfile of the dev container is also found.
Docker Compose
If you are using multiple services for development, you can use a typical docker-compose.yml file. You just need to add some tweaks for it work in a dev container. For instance, consider the diagram below using Influx DB and Grafana as my examples:
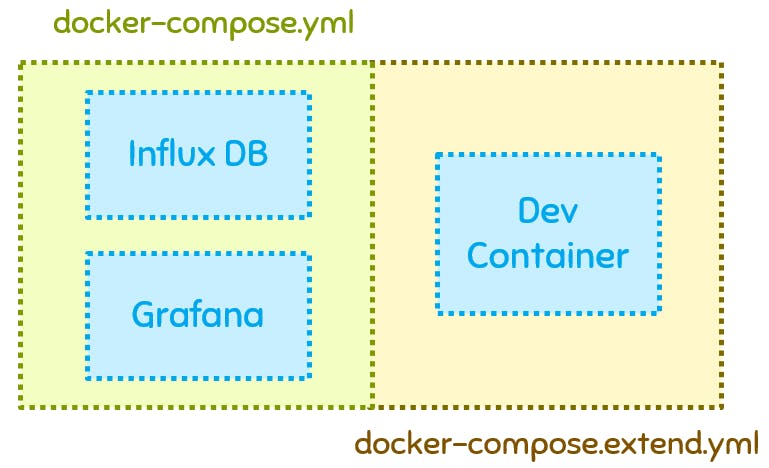
In this diagram:
- Your original
docker-compose.ymlcan remain as is. It contains the services that your app needs, like for example:
version: "3.8"

services:
  influxdb:
    image: influxdb:2.3-alpine
    restart: unless-stopped
    volumes:
      - influxdb-lib:/var/lib/influxdb2
    ports:
      - "8086:8086"

  grafana:
    image: grafana/grafana
    restart: unless-stopped
    volumes:
      - grafana-lib:/var/lib/grafana
    depends_on:
      - influxdb
    ports:
      - "3000:3000"
volumes:
  influxdb-lib:
  grafana-lib:
- A
docker-compose.extend.ymlmust be created. It can be placed in the.devcontainerfolder. It contains the definition of the dev container service (in our case,app).
version: "3.8"

services:
  app:
    build:
      context: .
      dockerfile: .devcontainer/Dockerfile
      args:
        VARIANT: 16-bullseye
    volumes:
      - .:/workspace:cached

    # Overrides default command so things don't shut down after the process ends.
    command: sleep infinity
- The
dockerComposeFileproperty of thedevcontainer.jsonmust be updated to use bothdocker-composefiles, like so:{ "name": "Node.js, Influx, & Grafana", "dockerComposeFile": ["../docker-compose.yml", "docker-compose.extend.yml"], "service": "app", ... } - When the dev container is started,
docker-compose.ymlanddocker-compose.extend.ymlare combined together thus starting both the required services and dev container. - When no network is defined, all the services will be ran on the
defaultnetwork. The dev container can reach the other services through its name likehttp://influxdb:8086andhttp://grafana:3000.
Caveats
Random disconnects and unresponsiveness
Dev containers can oftentimes be unresponsive and disconnect randomly. I managed to work around this by allocating more RAM to Docker. The recommended hardware requirements are 2 GB RAM and 2 virtual CPUs. If you are using a WSL 2 for Docker, you create or modify the .wslconfig file found in your users directory.
[wsl2]
memory=2GB # Limits VM memory in WSL 2 up to 2 gigabytes
processors=2 # Makes the WSL 2 VM use two virtual processors
Minor inconveniences for Docker Desktop non-users
I do not use Docker Desktop for my Windows Docker setup. I use on a WSL2-only Docker setup. I covered more about my setup on my previous article.
Some features of the dev containers extension does not work when Docker Desktop is not installed. For instance,
- You cannot try out a sample dev container - VS Code mounts the sample files on a temporary directory in Windows which WSL2-only Docker cannot resolve. This is assuming you created a
dockercommand alias in Windows that points towsl docker.
Closing Thoughts
At the time of this writing, it seems like VS Code is at the forefront leading the remote development. There are other similar solutions such as Gitpod which are essentially dev containers in the cloud.
Remember to check out VS Code's official and comprehensive documentation about dev containers!
Similar to my thoughts on my previous article, I would like to try Linux as my host OS. I believe the dev container experience will be better since Docker runs natively on Linux. I might no longer experience the issues that I am facing with dev containers. For now, I am grateful for dev containers and I am certain that it will keep getting better! 🥳